
Create a New Task or Event
Learn how to create, update, and manage tasks and events in your Planner.
Create a New Task or Event
Create a New Task
There are four ways to create a New Task, from:
Planner
From the homepage, open the left menu and click Planner. Select the Tasks tab and click New Task.
Module Plan
Within a Module, click the Module Plan icon and select the Add Task to Planner icon for your chosen section .
Section Cover
Click Add Task to Planner.
Learning Progress Page
Note: Tasks created from Learning Progress page are attached as Goals.
From the homepage, open the left menu and click Learning Progress and select the subject of your choice.
Under the Topical tab, click the Overflow (3-dot icon) and select Add Task to Planner.
On the New Task subpage, fill in the following details:
Title - The event title will be pre-filled for you as "Untitled", or "Target Marks: ___%" if you access from the Learning Progress page. Change the title to one that is concise and relevant.
Description - You can include details of the task here.
Complete By - You can indicate the deadline of your task here.
Attachments - You may attach assignments, resources or goals (only when adding from the Learning Progress page).
Click Create to proceed.
Update a Task
On the Planner page, select the Tasks tab, followed by the Ongoing tab to view all your tasks.
Click the Task card to view the task details.
To mark a task as complete, select Mark as Complete.
To edit or delete a task, click the Overflow (3-dot icon) and select Edit or Delete.
Create a New Event
There are two ways to create a New Event from the Planner page:
Click + New Event, or
Scroll to your desired time on the Planner and click on the time slot to create a new event at that time.
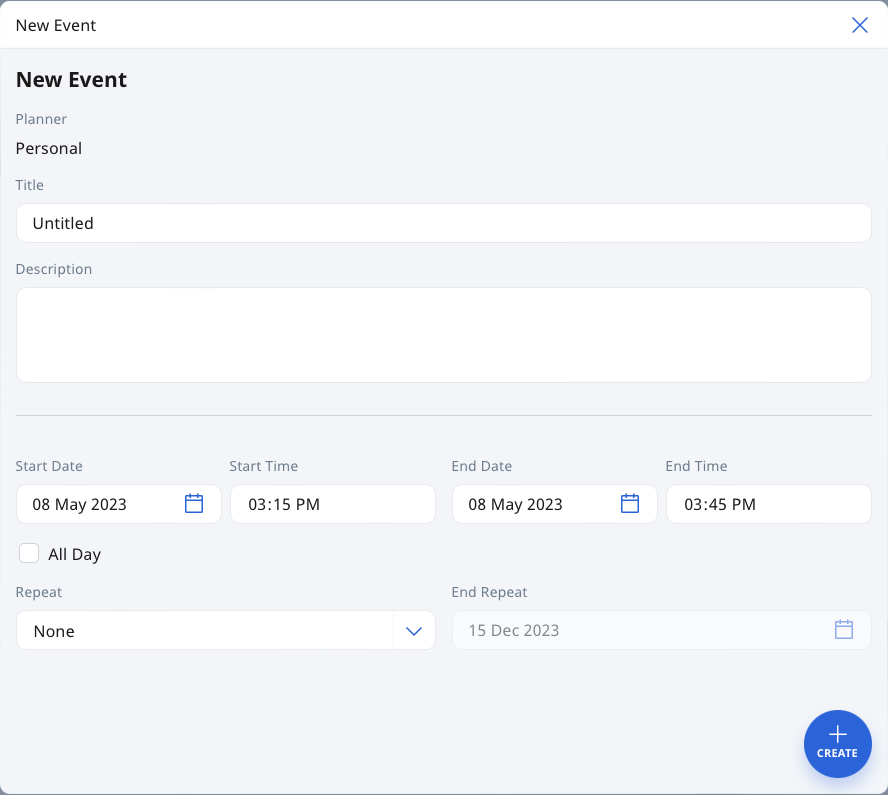
On the New Event subpage, fill in the following details:
Title - The event title will be pre-filled for you as "Untitled". Change the title to one that is concise and relevant.
Description - You can include details of the event here.
Start/End Date & Time - You can indicate the date and time of your event here.
Note: If the event is all day i.e. a Public Holiday, you may consider selecting the All Day checkbox.
Repeat - You can select how often the event repeats and the end date for the repeat.
Note: The End Repeat field will be greyed out if None or Custom are chosen for Repeat.
Click Create to proceed.
Edit an Event
Click the Event card to view the event details.
Click the Overflow (3-dot icon) and select Edit.
After making your edits, click the Save icon to confirm your changes.
Duplicate an Event
Click the Event card to view the event details.
Click the Overflow (3-dot icon) and select Duplicate Event.
Make any necessary edits and click Create to proceed.
A new Event card will be created at the stated start date/time.
Delete an Event
Click the Event card to view the event details.
Click the Overflow (3-dot icon) and select Delete.
If it is a recurring event, select if you wish to Delete this event only, Delete this event and all future events, or Delete all events in this series.
Click OK to proceed.
Add Attachments to Task or Event
You can attach assignments or resources from My Drive, Library and Starred Resources to a task or event in your Class Group and/or Personal Planner.
From the Task or Event subpage, select either the Assignments or Resources dropdown and click Attach.
For Assignments, you can:
Search for assignments based on title, Assignment Status, and/or Class Group. Click Apply to proceed.
For Resources, you can:
select From My Drive, From Library, or From Starred Resources under Attach Resources.
From the Attach Assignment or Attach Resources subpage, you can select the section or the whole module (without sections) you wish to attach.
Detach Attachments from Task or Event
Click the Task or Event card to enter the task or event subpage.
To detach an assignment, click the Overflow (3-dot icon) and select Detach Task.
To detach a resource, click the Detach icon on the Resource card.