(A1) View and Create Announcements
Explore SLS Functions
Administer
Administer
(A1,i) Onboard New Students
(A1,ii) Reset Student Passwords for Classes
(A1,iii) Generate Passcode for Students (Enhanced)
Assess
Assess
(A1) Create Quizzes
(A2,1) Monitor Students' Responses in an Assignment (Enhanced)
(A2,2) Analyse Students’ Responses with Data Assistant (Enhanced)
(A3,1) Add Teacher Comments (Enhanced)
(A3,2) Annotate (Underline) Students' Responses (Enhanced)
(A3,3) Mark Free Response Questions
(A4) Print to Scan
(B1) Mark Teacher Marked Quizzes
(B2,1) Release Teacher Marked Quizzes
(B2,2) Unsubmit Teacher Marked Quizzes or Questions
(C1,i) Add Feedback Assistant Mathematics (Enhanced)
(C1,ii) Add Annotated Feedback Assistant (Enhanced)
(C1,iii) Add Short Answer Feedback Assistant (Enhanced)
(D1,i) Edit Quizzes (Enhanced)
(D1,ii) View Students' Notes
(D1,iii) Manage Assignments, Sections, Activities (Enhanced)
(D1,iv) Submit Quizzes
(E1,i) Login for E–Assessments (New)
(E1,ii) Set Assignments as Assessments
(E1,iii) Add and View Access Codes
Assign
Assign
(A1,i) Create Assignments
(A1,ii) Quick Assign Activities & Quizzes
(A1,iii) Assign MOE Library Modules
(A1,iv) Assign Community Gallery Modules
(A1,v) Add or Sort Assignments in Class Group
(A1,vi) View Assignments (Enhanced)
(A1,vii) View Past Assignments
(B1,i) Manage Assignments
(B1,ii) Schedule Assignments
(B1,iii) Edit Assignments
(B1,iv) Pause & Resume Assignments
(B1,v) Move Assignments
(B1,vi) Delete Assignments
(B1,vii) Copy Assignments
(B1,viii) Allow Students to Copy Assignments
(B1,ix) Allow Students to Share Assignments
(B1,x) Annotate in Teacher's Copy of Assignment (Enhanced)
Authenticate
Authentication
How to Log In (Teacher)
Reset SLS Password (Teacher)
Password Reset Email
Locked Account
Author
Author
Create New Modules
Activate Learning Assistant in Interactive Component (Enhanced)
Use Authoring Copilot to create New Sections (Enhanced)
Use Authoring Copilot to create New Activities & Components (Enhanced)
Use Authoring Copilot to create New Quizzes (Enhanced)
(A1,1) Add New using Templates
(A1,2) Add New Activities & Sections
(A1,3) Add Existing From Library & Starred Resources
(A1,4) Add Introduction
(A1,5) Add Section (Adaptive) (Enhanced)
(A2,1) Add Components
(A2,2) Add Split Page Media
(A2,3) Upload Question and Test Interoperability (QTI) Files
(A2,4) Add Multiple Choice Questions
(A2,5) Add Fill in the Blanks Questions
(A2,6) Add Click and Drop Questions
(A2,7) Add Error Editing Questions
(A2,8) Add Free Response Questions
(A2,9) Add Audio Response Questions
(A2,10) Add Multi Part Questions
(A2,11) Add From Existing Questions
(A2,12) Add Display
(A2,13) Add Rubrics to Audio and Free Response Questions (Enhanced)
(A2,14) Embed YouTube Videos
(A2,15) Insert Media Objects
(A2,16) Insert Transcript for Video & Audio
(A3,1) About Rich Text Editor
(A3,2) Formatting & Paragraphing
(A3,3) Insert Chinese or Tamil Text
(A3,4) Insert Mathematical or Chemical Equations
(A3,5) Insert Tables
(A3,6) Insert Emoticons
(A3,7) Insert Drawings
(A3,8) Insert External Links
(A3,9) Insert Links to Sections
(A3,10) Insert Tooltips
(A3,11) HTML5 Content Development (Enhanced)
(A3,12) Text–to–Speech
(A3,13) Speech Evaluation Tool
(A3,14) Localisation and E–Dictionary
About Templates
(B1,i) Manage Modules
(B1,ii) Edit Modules (Enhanced)
(B1,iii) Edit Activities & Sections
(B1,iv) View and Edit Module Plans
(B1,v) Make a Copy of Modules or Assignments
(B1,vi) Edit Detail cards
(B1,vii) Add Question Tags
(B1,viii) Add Module Tags
(B1,ix) Edit Media Objects
(B1,x) Move Modules to Trash
(B1,xi) File Size Limits
(C1,i) Copyright Resources
Collaborate
Collaborate
About the Forum
(A1,1) Add a Topic
(A1,2) Add a Poll
(A2) Change Forum Settings
(A3) Post and Comment in the Forum (Enhanced)
(B1) Create Team Activities
(B2) Create Teams
(C1,i) Add an Interactive Thinking Tool
(C1,ii) Add a Poll
(C1,iii) Add a Discussion or Live Chat (Enhanced)
(C1,iv) Attach Google Files
(C1,v) Add Google Meet Link
(D1,i) Share a Module
(D1,ii) Access a Shared Module
Customise
Customise
(A1,i) Customise an Avatar
(A1,ii) View and Edit Profile
(A1,iii) Set an Alternate Email Address
(A1,iv) Set Email Notifications
(A1,v) Manage Linked Account
(A1,vi) Change SLS Password
(A1,vii) Switch to Student Account (Enhanced)
(B1) Manage My Templates
Differentiate
Differentiate
(A1) Create Subgroups
(A2) View Subgroups
(A3) Edit & Delete a Subgroup
(B1,i) Add Activity, Quiz or Section Prerequisites (Enhanced)
(B1,ii) Set Differentiated Access
Discover
Discover
About Resources
(A1,1) Add Existing Activities from Resources
(A1,2) Add Existing Components from Resources
(A1,3) Add Existing Media Objects from Resources
(A2) Search for Resources (Enhanced)
(A3) View Module Details
(B1,1) View External Resources
(B1,2) Previously Whitelisted & Non Whitelisted Websites
(B2) Embed Whitelisted Websites
(C1) Access App Library
(C2) Embed Integrated Apps
(D1) Access My Subjects
(D2) Follow & Unfollow Subjects
(E1,i) Make a Copy of a Module
(E1,ii) View Print Friendly Worksheet
(E1,iii) Upvote and Leave Reviews
(E1,iv) About Adaptive Learning System (ALS)
(E1,v) Tag Resources to Adaptive Learning System
(E1,vi) Link Activities in ALS Content
Enact
Gamify
Gamify
About Gamification and Leaderboard (Enhanced)
(A1) Manage Gamification Settings (Enhanced)
(A2) Game Stories and Collectibles
(A3) Add Conditions to Game Story or Collectibles
(A4) Create Game Teams
(B1) Display Leaderboard for Students
(B2) Quiz Leaderboard and Ranking
(C1) Award XP, Game Story and Achievements Manually
Notify
Notify
(A1) View and Create Announcements
(A2) Manage Announcements
About Notifications
(B1,i) View Notifications
Organise
Organise
About Class Groups
(A1) Create Class Groups and Communities
(A2) Add Teachers as Students to a Class Group
(B1) Manage Class Group Resources
(C1,i) Install and Launch Apps
(C1,ii) App FAQs
(D1,i) Pin Class Groups
(D1,ii) Archive Class Groups
(D1,iii) View and Restore Past Class Groups
(E1) Access My Drive
(E2) Search in My Drive
(E3,1) Create New Folders
(E3,2) View Modules Shared with Me
(E4) Delete Resources
(F1,i) Copy Modules within My Drive
(F1,ii) Manage Folders
(F1,iii) Restore Resources from Trash
(G1) Star Resources (Enhanced)
Personalise
Personalise
(A1) Set Optional Activities & Quizzes
(A2) Recommend Content to Students on Adaptive Learning System
Plan
Plan
(A1) Access Planner (Enhanced)
(A2) Create a New Task or Event (Enhanced)
(A3) Attach Assignments and Resources to Events (Enhanced)
Publish
Track Progress
Track Progress
(A1,i) Access Learning Progress
(A1,ii) View ALS Learning Progress
(A2,i) View by Topic
(A2,ii) View by Month
(A2,iii) View by Student
(A2,iv) View Excluded Questions
(B1) Access Error Tracker (Enhanced)
Other Useful Information
(A1) View and Create Announcements
View Announcements
All Announcements can be found under the Notifications page. Announcements can be accessed from two locations:
- click View All Announcements from the Announcements widget on the homepage, or
- click Announcements from the left menu.
You can view Class Group Announcements from your Class Groups, under the Notifications tab.
Create Announcements
There are two types of Announcements:
- Class Group Announcements
- School Announcements (for SLS Admins only)
- From the homepage, click the Create New Announcement widget to open the New Class Group Announcement subpage. Alternatively, you can enter this subpage by
- clicking View All Announcements from the Announcements widget on the homepage followed by Add New Announcement,
- opening the left menu and clicking Announcements, followed by Add New Announcement,
- entering a Class Group, under the Notifications tab, clicking Add Class Group Announcement.
- On the New Class Group Announcements subpage, select the Class Group(s) you wish to send an announcement to, from the dropdown list. Should you create an Announcement from a Class Group, the Class Group would be specified for you.
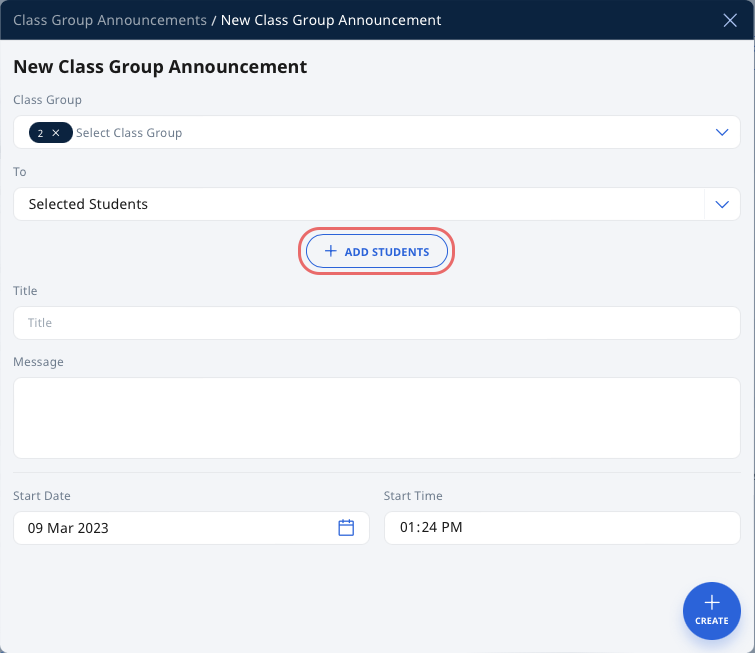
- You can choose to send the Announcement to All Students and Teachers within the Class Group or to Selected Recipients from the dropdown list.
- If you choose to send the Announcement to selected recipients, click Add Recipient followed by selecting Student or Teacher.

- In the Add Students/Teachers subpage, select the checkboxes on the left to include students/teachers into the Announcement. You can toggle across Class Groups (should you choose more than 1 Class Group) from the dropdown list.

- Click Add to proceed.
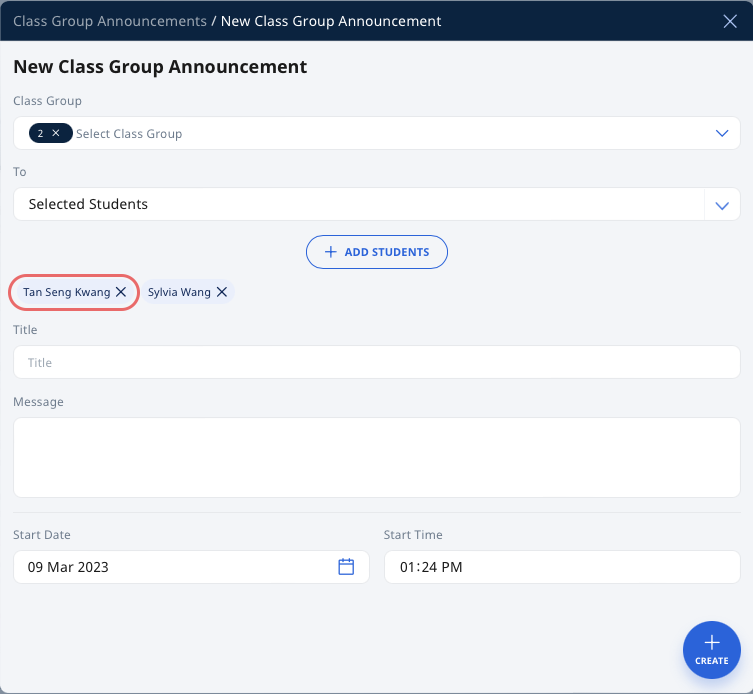
- The names of the selected students/teachers will be shown. To remove them from the list, click the X beside their names.

Note: All Announcements created will expire after 90 days.
Enter Announcement Message
- Enter the Title. This will be displayed in the Announcement listing.
- Enter the Message in the Rich Text Editor.
- Select the Start Date and Time of the Announcement.
Note: The Announcement will only appear on the recipient’s homepage, Notifications page, and the Notifications tab within the Class Group page after the Start Date. The Announcement will expire in 90 days from the start date. - Click Create.
- Once the Announcement has started, the recipients will receive a Notification.

